Deep Dive: Facebook Advertising
So You Want to Start Advertising on Facebook?
You’re in good company! When I started my social media marketing business, I found that a majority of my clients were really interested in social media advertising - and for good reason. Facebook is one of the biggest players in digital advertising and is essential to any online ad strategy for your business. Adding to that, it’s the first thing most businesses look at when trying to scale their business marketing because doing so boosts your posts, increases your reach and gets more eyeballs on your product or service. But where to start? Today, I’m spilling the social media tea and giving you a deep dive into the ever elusive Facebook Ads. Let’s get started!
Before we start “spilling the tea”, let’s talk about what you will need before you even think about Facebook Ads.
A Facebook business page that includes an ad account
A website
An email list
An offer that converts
A deep understanding of who your audience is
An advertising budget
Most people have the first two when starting ads but those are the same people that end up spending far more money because they aren’t using an email list or utilising email marketing, they haven’t nailed down a converting offer or have a sizeable advertising budget and instead of a deep understanding of their audience, they want to market the ad to everyone possible.
As a result, these ads are expensive and generally a waste of effort that leads them to then think that Facebook Ads don’t work at all. This blog post is my attempt at trying to dispel some of the myths and give you a deeper insight into how to make advertising work for you.
Depending on your budget, there are two main ways that you can reach people through Facebook Advertising: Paid and Organic. Think of it like the yin to the other’s yang. Both can be highly effective but naturally when you opt for organic advertising, you need more time to reach your potential customers and to market your product or services. When you invest in paid advertising methods, you can get the ball rolling much more quickly and efficiently but the downside is that this requires a certain amount of money. The amount of money varies for each budget and directly affects the outcome of each ad you create. While the biggest downside to organic advertising is that organic reach on newsfeed is essentially non-existent thanks to the billions of people currently using Facebook on a daily basis.
I’ve divided the whole of Facebook Advertising into these two categories because paid methods of marketing on Facebook are fully integrated into the platform and specifically designed for ads. Utilising the free methods don’t require any built in tools. This is why it’s time efficient to pay, but cost efficient to not…. you get the idea. So before you start any ad campaign online, be honest with yourself about your budget and the result you can expect to get from the different options.
Okay, ready to deep dive? Here are a few methods of paid advertising and how to use them for your next ad.
Types of Paid Advertising
Boosting posts
This is usually the first stepping stone to a full ad campaign. Only about 30%, (this percentage gets less and less over time) of your fans will be able to see your posts naturally so if you want to reach more people, it’s a good idea to start by boosting the posts on your page. (Sidenote: this also includes Instagram posts, as Instagram and Facebook are the same company)
The easiest way to boost a post on your Facebook page is to post something, and then go to the bottom right corner of your post, where a “boost” card will appear. Click on it and a new ad window will open.
On your left side, at the top corner you will see the “Objective” section which allows you to choose between post engagements or direct interaction via messages. Below this is the “Audience” section, where you can find several options for choosing the audience you wish to target with your ad. Facebook will automatically create a target audience for you but it is highly generalised so you will need to create custom audiences for your ads. You can lay a little groundwork for yourself ahead of time by creating a custom audience or simply press “edit” to fine-tine the audience targeting.
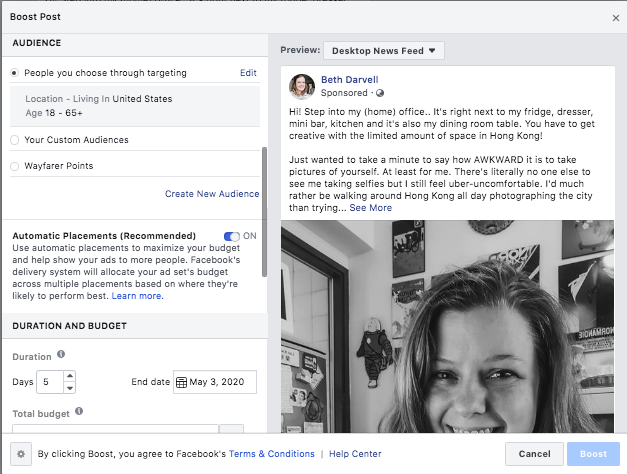
Underneath “Audience”, you will find the “Budget and Duration” section, where you can also adjust how much you will be spending on your ad per day and how long the ad will last or until which date. Bear in mind that boosting a post is different to creating a full ad campaign so you won’t have a daily budget and that you can only insert the total budget for the ad.
However, if you want to know how much money you will be spending daily, just insert the budget and the number of days you want the ad to run and divide these two. Based on your target audience, their location and the budget you set, you will get an estimation of how many people will be reached by your post.
You have the option to fine tune your ad as long as possible, until you are certain that you’ve hit that sweet spot. When you are done, click on the “boost” button in the bottom right corner and your ad will be sent to review and get boosted fairly quickly if everything is OK. When your ad is approved and your post gets boosted, you will be able to track the results in real time and see how many people it has reached.
Additionally, if you are happy with your post boost ad and it’s slowly running out, you can simply click on the “add more budget” button to continue your ad or reach even more people. At the end of your boost, you can check all the important metrics such as post reach, engagements, how many people clicked on your post, how many shared, and which countries the people who liked your post are from. Easy enough right?
Automated Ads
If you’re looking to drive some more direct action for your business with minimal setup time – Facebook Automated Ads could just be what you’ve been looking for. This is a relatively new feature that allows you to build a custom advertising plan for your business in a matter of minutes. Facebook then, in turn, will create ads to run on an ongoing basis, automatically.

This method will be ideal for anyone who has to wear multiple hats in their business as the ad creates itself, saving you a ton of time, energy and cost. After you complete Facebook’s survey, it will get straight to work on creating your campaigns but you still have some input, on things like ad copy, destination URL, and some of your targeting criteria. But by utilising Automated Ads, the whole ad creation process is easier and more straightforward.
All you’ll need to get going is to pick some assets, a Facebook Pixel in place, write ad copy and of course have ad spend ready to go. Once the campaign is up and running, it will appear in Ad Manager so you can see how it’s progressing alongside your other campaigns.
Facebook Automated Ads Vs. Boosted Posts
Facebook Automated Ads and Facebook Boosted Posts are very similar in many respects but also aren’t the same. Boosting a post may help you get more people to like, share and comment on the posts you create. while Automated Ads are full campaigns that create themselves. Both of these options are not ideal though.
There’s nothing wrong with either if that’s what you want. In my experience though, when someone boosts their post, what they really want isn’t post engagement, it’s sales, leads or website visits. And that’s not the purpose it serves. With a boosted post you have to ask yourself; how many of those who liked, actually visited the website? How many of those actually went on to perform one of those valuable actions? Likewise with Automated Ads, it’s less targeted because it’s been created automatically but they’re designed to find people who are likely to take the action you want them to and to run on a longer time scale which allows them to optimise and improve over time.
Facebook Pixels
Okay, let’s move on to another crucial element of Facebook advertising: the Facebook Pixel.
Social media is essentially a support system for your marketing funnel and should be used with the intention of driving traffic back to your website, blog, store etc. With a Facebook Pixel, you can actually track where the highest traffic is on your website and use this data to inform your ad strategy.
When you create a Facebook Business or Advertising account, a unique pixel is automatically created for you. After you copy and paste this code into your website, you’ll be able to track data from your visitors, create custom Facebook audiences based on their behaviours while on your website and specifically target your ads to a “warm” audience. Data is everything in social media marketing and using a Facebook Pixel gives you incredible insight into your customers and website visitors.
Are You Ready For A Full Campaign?
I’m going to walk you through each step of setting up your full ad campaign. When you have everything in place, the ad creation is actually a simple process. (Sidenote: Always A/B test your ads so you are able to learn from every ad you create. My recommendation is to start with smaller, shorter campaigns when you’re in the testing stage of your ad and then once you know what works,,, go big!)

Choose Your Objective: To choose the right ad objective, answer the question "what's the most important outcome I want from this ad?" It could be sales on your website, downloads of your app or increased brand awareness. As you can see on the right, each of these objectives will affect your ad differently so the images may look slightly different based on what you choose.

Select Your Audience: Using what you know about the people you want to reach – such as age, location and other details – choose the demographics, interests and behaviours that best represent your audience. You can get most of this date before ad creation through your Insights on Facebook, Instagram and a number of analytical apps and tools. You have an option to use a Saved Audience which can include Lookalike audiences based on data from your Facebook Pixel.
I’ll go over Facebook Audiences in more detail in a later blog post but here’s what you need to know.
Custom audiences allow you to target Facebook users based on:
Customer file (email addresses you upload)
Website traffic (provided the Facebook Pixel is on your website)
App activity (pretend this doesn’t exist)
Engagement (explicit action taken on either Facebook or Instagram)
Lookalike Audiences are the cream cheese frosting atop the cinnamon roll that is Facebook advertising. This is fact, not opinion. While custom audiences are generally limited—since you need to upload a list or supply users based on on-site in-app actions completed—lookalikes are simply aggregated users whose characteristics mirror those of a selected source audience.
The “source audience” for your lookalikes can be any Facebook audience you’ve already created; to maximise their value, though, you should use converters (based on the Facebook Pixel) or customer email addresses.

Decide Where To Run Your Ad: Next, choose where you want to run your ad – whether that's on Facebook, Instagram, Messenger, Audience Network or across them all. In this step, you can also choose to run ads on specific mobile devices. My recommendation is to always use Automatic Placements because Facebook will auto-target your ad to the highest performing placement, which will save you money.
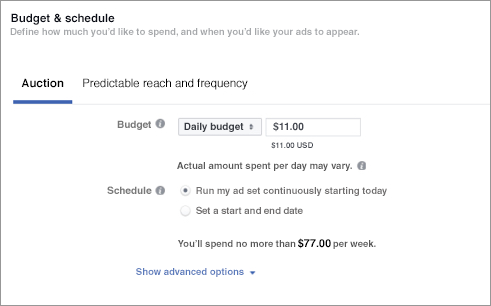
Set A Budget: Enter your daily or lifetime budget, and the time period during which you want your ads to run. These limits mean that you'll never spend more than you're comfortable with. If you’ re hiring someone (like me!) to do your ads, part of your ad budget should include their fee as well as what you will be paying Facebook. There are a lot of great tools for figuring out how to create a Facebook Ads budget, so you’ll be able to plug in the numbers when you get to this step.

Pick A Format: Choose from six versatile ad formats – they're designed to work on every device and connection speed. You can choose to show a single image or video in your ad, or use a roomier, multi-image format. You should test which format performs best for your business first but generally video and full-screen experiences provide the best ROI.
Place Your Order: Once you’ve submitted your ad, it goes into Facebook’s review process and once approved you can start tracking the data and your ad creation is done! Congrats!

Measure and Manage Your Ad: You can track performance and edit your campaign in Ads Manager. See if one version of your ad is working better than another, or if your ad is being delivered efficiently, and make tweaks and adjustments as needed. Ads are editable, but every edit means another review process.
Analysing the Data
How to follow up your ad campaign
Just creating an ad and letting your campaign run out is simply not enough when it comes to Facebook advertising. Trust me, you will doing it over and over again, and you should make sure that you always do it better the next time. To do this, you will have to rely on your ads manager to see how your ads performed and learn where you made mistakes and where you did good.
Go to your ads manager and then click on the tab called “Account Overview”. This is where you will be able to learn a lot about your ad campaigns and gain valuable insights that can help you create much better ads in the future. There are many things you can do and see in the account overview section.
Choose the metrics you want
There are 4 sections to choose from for your metrics and they can all be adjusted and changed depending on what your needs are. You just need to click on the arrow symbol pointing down and a new window will pop out. Here you will be given brand new options for choosing a metric you want to be displayed.
Comparing how your ads performed during different periods
Click on the date range button, then click the compare section and a calendar will appear, giving you the option to choose different dates that you want to compare. This is how you will be able to learn more about how your campaigns performed, as well as what time factors affected them and in which way.
To analyse ad campaigns with charts, you should use different metrics. For example, if the ad campaign is for page likes, there is a page like the section that will tell you how many people liked your page during the ad, as this is the most valuable metric in this kind of ad.
You can also find geographical and demographic information about the audience that interacted with your ad, and see what mobile devices they are using to convert or view your ads. Simply click on the breakdown section and choose from “by deliver”, “by the time” or “by action”.
With just these insights, you will have a lot on your hands, so be prepared to learn more and get the experience needed to recognise trends and improve your future ad campaigns.